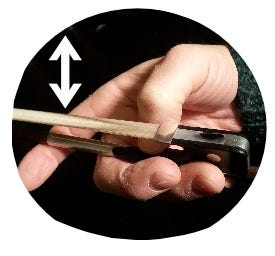
Here’s a game I like to call the “Windshield Wiper,” for pretty obvious reasons, as we hone in on different parts of our right arm and hand that have a huge impact on our sound, timing, expression, and musicality. (The list of right arm “controllers” can be found at this link.)
The Windshield Wiper can help improve the bow hand of any player, and is a great followup to the Thumb Roll https://epearlman.substack.com/p/the-thumbs-time-to-shine, which is perhaps the only exercise that spotlights the importance of bending the thumb. Starting with the Thumb Roll and moving to the Windshield Wiper is a great warmup. It’s also an excellent way for beginners to get a physical feel for a good bow hold without having to memorize a bunch of rules.
Exercise or Game?
When we play a game, we try it over and over to see if we can do it better, to achieve more goals, to “win.” The more we play, the more connections we notice, the more strategies we discover, and the better we understand the impact of our choices. It’s fun to master a game, and the more we play it, the better we get at it. This is why I like to think of this series of physical bow exercises as games. Often when people think of “exercises,” they think of a hard skill they have drill until they can check it off as done and move on. We don’t check off games, we just play them and get better at them.
Fingers and Toes
Today’s game, the Windshield Wiper, is an easy way to make your bowhand fingers think about what they are actually able to do for you. Too often we take our fingers for granted, letting them do their thing “naturally” instead of engaging them. Having played music for many dance classes, and having listened to lots of dance exercises, I find myself comparing the bow hand to the dancer’s feet. Many people think of their feet as things at the end of their legs, things we walk on somehow. In a good dance class, students learn that if they mindfully engage their toes, they gain greater balance and control of their movements.
In the same way, engaging the different fingers of the bow hand builds more control of the bow strokes. It helps us focus on the what’s important — leverage, rather than grip.
Understanding vs Doing
As with all the games/exercises in this series, there are things to be aware of, and you’ll pick up on more of them the more you try it, but I’ll try to point some of them below. In the end, these are not intellectual exercises. It’s helpful to understand what you’re doing but that is never enough. The goal is for your muscles to get comfortable with and explore the movements you’re asking of them. After all, it’s the muscles and ears that actually play the instrument, not the brain and eyes!
And yet, to write out a description of what goes into this exercise takes a lot of words — sorry! You might find the video at the end of this post to be very helpful.
Windshield Wiper
1. Holding the bow upside down and parallel to the floor, keep the thumb bent against the hairs, the thumb tip pointing downward onto the stick, the first finger kept straight underneath the stick. The tip of the first finger won’t touch the stick (now or ever!). The little fingertip is only fingertip touch the stick from underneath (since the bow is upside down). Ideally the little finger is bent in a lovely arc and not straightened out, which requires a lot more work. Keep the hand relaxed. Leverage — the thumb on top and the first and little fingers on bottom — is what keeps the bow from falling. If the middle fingers are relaxed, they’ll touch the stick too; if they pull away from the stick, it means they’re tensed up.
2. Push the bow up a tiny bit with the straightened first finger, maybe a half-inch, and let it down again to its original spot. This is a very small movement, like your first finger is gauging the weight of your bow. Allow the first finger to weigh the bow a few times. Make sure to isolate the movement and limit it entirely to the first finger moving from its base knuckle, without any help from the hand or wrist or forearm (no matter how nice they are to offer assistance).
3. Increase the push of the first finger until you give a nice shove, rotating the wrist, and allowing the bow to flip all the way over, right side up. Catch and keep the bow parallel to the floor using just the little fingertip, which is now on top. If you can keep the little finger bent (sometimes a new sensation because our little fingers are notoriously weak), it won’t have to work very much to counterbalance the bow. Is the thumb still bent?
4. Give the little finger a chance to do what the first finger did — press the little finger down a little, maybe a half-inch, and lift to where it started. Let it feel the weight of the bow. When the little finger moves, the bow will follow. If for any moment, the little finger is not in contact with the bow, it means the hand is gripping the bow, which is too much work; it should relax except for the working finger. The thumb should be passively supporting the bow, while the little finger has the leverage to move the tip of the bow up and down by pushing down and releasing a few times. Isolate the little finger’s movement from its base knuckle, with no help from the hand or wrist or forearm.
5. Now push down hard with little finger and flip the bow upside down again, catching it with the first finger, and repeat the whole exercise a few times. Try to isolate the first finger as it weighs the bow, and then the little finger as it does its work, and keep the rest of the fingers relaxed and in touch with the stick.
15-30 seconds is enough for this whole exercise. Doing it mindfully every day is great for your bow hand. Check out the video below for extra help!
Video, below
Try the exercise right along with the video; it’s a good excuse to just do it and avoid memorizing all those words above (although you’ll need to know them for the final exam, of course…).
Note: This and 9 other useful videos can be found in Technique Video Group 1 on fiddle-online.
I like to avoid paywalls, but in thanks to those who are paid subscribers, and to honor those who pay for the Technique Videos on fiddle-online, this video requires a paid subscription.
If you are getting something out of these posts (many more to come!), consider that a paid subscription is equivalent to paying for one 5-minute private lesson per month!
Keep reading with a 7-day free trial
Subscribe to Learning Fiddle & Other Musical Musings to keep reading this post and get 7 days of free access to the full post archives.